
If you love no-sew projects, which I do, you will absolutely love making this adorable Robot costume. It’s perfect for a little boy or little girl and we utilized something we all have … a pillowcase!
Little boys especially love dressing up as Robots, SuperHeros and Monsters. So you can make this cute and easy DIY Robot costume for Halloween or just for fun play. We started with a pillowcase so it is a perfect size for kids. Even better, it is a no-sew costume you can make in an afternoon. And you won’t have to relegate this little costume to the storage trunk cause this little number is going to get some serious playtime even after the holiday has passed. In fact, many of the costumes we have created are great to keep handy for the kids to play with during the entire year.
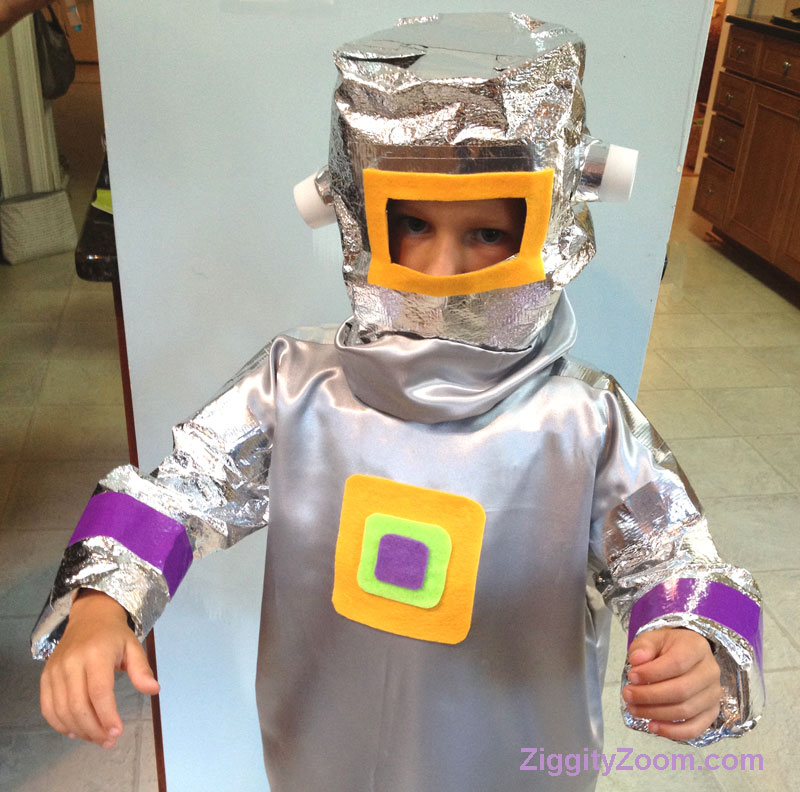
The pillowcase we used is silver but you could really use any color for a robot costume. The more colorful the better, right? For the arms and head gear, we found some silver foil tissue paper that is nice and sturdy but also lightweight and bendable. We debated about turning this costume into an Astronaut, which would be super easy … just make a felt “flag for the front of the costume and a helmet for the head instead. Lots of options here.
Items Needed:
- Pillowcase
- Colored felt
- Silver foil tissue paper
- Silver duct tape
- Colored duct tape
- Scissors
- White glue
Instructions:
- Wash and iron pillowcase to remove wrinkles.
- Fold pillowcase in half, lengthwise, and then cut a small neck opening on folded edge. Unfold and then cut a small slit down the back from the neck opening to accomodate the head.
- At each side seam, cut away a 1/2 inch slice for the arm holes.
- Remove the bottom banding of the pillowcase using scissors.
- Cut desired design for front of costume from felt and glue in place and let dry while making the arms and Robot head gear. We just cut squares of different sizes and rounded the edges, which is simple yet cute.
- The ARMS can be made from the foil paper like we used or you can make plastic bag arms and cover with flexible silver duct tape. Just leave a slight space between circles of tape so the arms can be moved when the costume is worn.
- Measure child’s arm length and cut thelength accordingly. We cut 2 pieces of foil to 16″ x 12″. Our arms were a bit long but we then folded them under but you could just remove the length if too long. You want to fold the foil in half, lengthwise, and then slightly overlap the edges. Tape together with the silver duct tape.
- Tape the arms in place around the already cut armholes. Use the duct tape once again for this step. Add colored duct tape for additional Robot decoration.
- For the HEAD: Cut a piece of foil 16″x25″ Tape the 16″ sides together with duct tape. Insert a small box into the “tube” and now fold over the edges at the top (will be the top of the Robot hear gear) and tape together securely with duct tape.
- Measure where your child’s eyes and nose will be from the top and then cut a rectangular opening. Try on child and then after any adjustments, cut a felt section to frame the face/nose opening.
- If desired, use a section of the “banding” removed from the bottom of the pillowcase and cut/ tape a section to fit over the neck area. This finishes off the look of the costume.
- Lastly, we added two little plastic cups to the sides of the robot head for Robot ears. These can be duct taped on.