
When I was growing up, some of the holiday decorations I most loved were the little cardboard houses decorated with glitter. You can find them in nice antique stores sometimes but other than that they are hard to come across. So, lightbulb moment … lets’s make our own! So, that’s what I did with a few of the old cardboard boxes I’d been saving. Another reason to keep a bunch of recyclables handy. You just never know when we will come up with the next fun project.
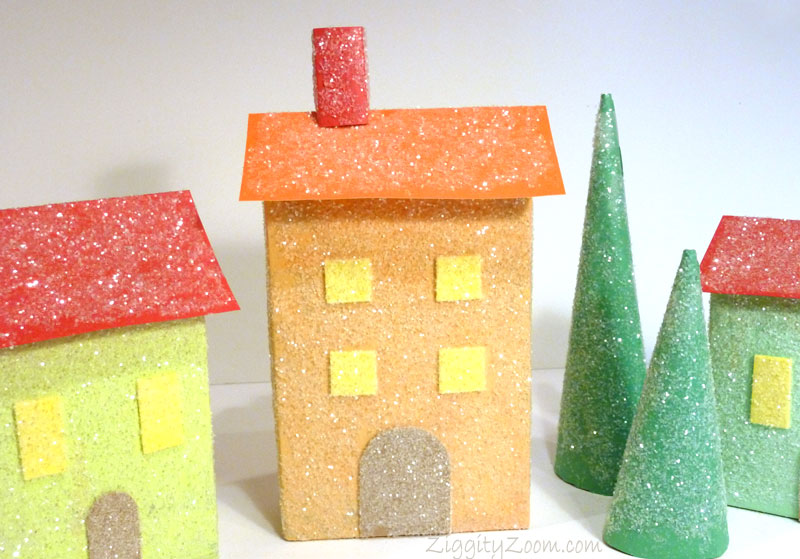
These adorable little houses can be made in an afternoon and the kids can even help. Kids, as you know, love to do any type of glitter project! The holiday village can be as small or large as you want it. It’s a perfect Christmas decoration for a mantle or a holiday centerpiece. Best of all, you can use the snow village from year to year and make your own little tradition of setting it up for the holidays.
Items needed:
- Small boxes
- Recycled file folders
- Sticky-back craft foam
- Tacky white glue
- Scissors
- Paint/ brush
- White sparkle Glitter
- Scotch tape
- Stapler
Instructions:
- Collect boxes for buildings, such as a tea box, small instant potato box, etc. You can also make a Mini-village using just tiny discarded boxes. Tape all openings shut.
- Paint boxes and let dry. We made tinted white mixtures, using a small amount of color with white paint to get pastel shades.
- Make trees from old green file folders or other thin cardboard. Roll cardboard/folder into a cone shape the desired size. Staple bottom edge to hold and then tape along edge as necessary to hold shape. Level off bottom with scissors.
- Cut doors and windows from the sticky-back foam and stick in place on each building.
- Make each roof from a piece of file folder of the desired color or use cardboard and paint. Roof should extend beyond the sides of the building. Cut a strip of folder/ cardboard the width of the top of your box and approximately 2 inches longer on each side. You are going to use the 2 inch extensions to cut a peak (2 sides of triangle) and then fold at the edges of the box. Glue flat section to top of box to secure peak. Set Roof on top.
- To make a chimney, cut a lengthwise piece of cardboard, about 2 inches high and 4 inches long. Fold into 4\’s and tape together. Cut a v on two opposite sides to fit your roof peak.
- Working within a cookie sheet with closed edges, and on one section of building at a time, i.e. the roof, spread a thin layer of glue and spread around with your finger. Immediately sprinkle with glitter and then let dry. For the roof sections. lay flat after adding glitter and set a fork or similar object on top to keep flat until dry, to avoid curling.
- Repeat for all sections, trees and buildings. Enjoy.
Copyright Sharon Pierce McCullough / ZiggityZoom.com