
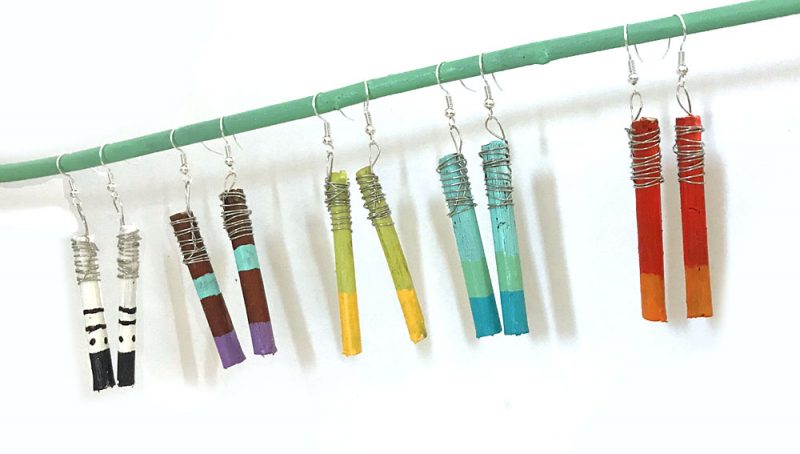
Pretty Stick Earrings
This DIY project is one that is very simple. It’s a fun craft that incorporates nature, using small, thin twigs that can be turned into pretty jewelry. This project can be completed by tween, tweens or adults. And it’s an inexpensive project to make. Wouldn’t these colorful earrings make ideal gifts to give to friends for birthdays, Christmas or just as a friendship gift?
If you are looking for a fun starter jewelry craft project, this is perfect. We love that your creativity can shine, adding your own personal touches by way of color, design or markings.
Materials List
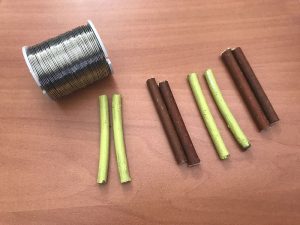
- Straight thin sticks
- Pruning clippers
- Paint/ brushes
- 24 gauge silver wire
- Needle nose pliers
- Tacky glue
- Silver fish hook earring wires .
Notes: When choosing sticks, look for thin straight sticks, less than a 1/4″ diameter. The bark should be tight and smooth, if possible. Sticks should also be dry and not easily break. Wire can be purchased at any craft store or online. Usually it will be found in the jewelry making aisle. You definitely want 24 gauge wire, so you can easily wrap the wire tightly around the sticks.
DIY How To
- Collect sticks and let dry. Clip to lengths of about 2 inches or slightly longer, depending on preference.
- Set into pairs. Choose paint combinations for a pair of your earrings and then paint the background color and let dry thoroughly.
- Paint additional colors and add markings. Markings and designs can be added with paint or permanent marker. Let all paint dry completely.
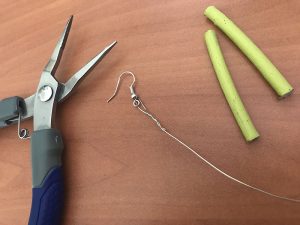
- Cut two length of wire, 12 inches long, for each set of earrings.
- Insert wire into the loop at the end of an earring wire.Slide the earring hook down about 1/2 inch or slightly more, bend end of wire at this point. Holding earring hook, twist the two pieces of wire just below several times. This will keep the earring hook in place.
- Now, dab small dots of glue to the top 1/2 inch of an earring stick, making sure to not overdo the glue.
- Position the earring hook at the start of the wire twist, against the top of the earring, holding in place with your left hand (if right handed). Using your right hand, start to wrap the wire, about 3/4″ down from the top. Wrap tightly around the stick earring, moving upward in order to cover the top section of the earring. Finish by grasping the finishing end of the wire with needle nose pliers, to turn into the stick area so that no end points outwards.
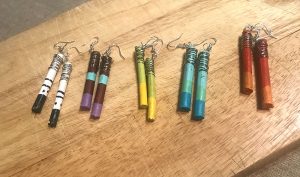
These earring only take a short time to make and once you’ve made one, you can quickly make a number of pairs. Have fun and be creative!