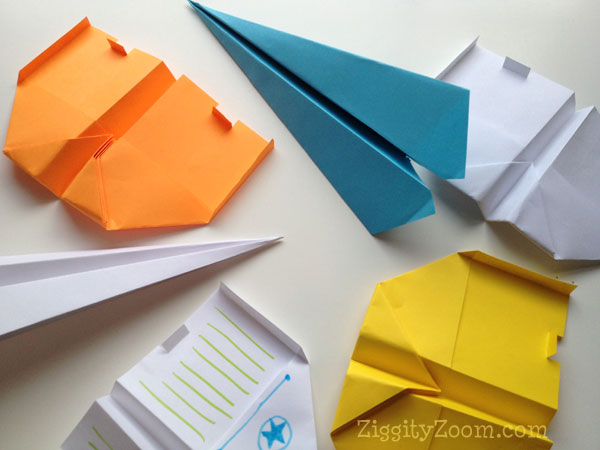
I can still remember when my own father taught me how to make a paper airplane. It is one of the simple pleasures from my childhood and it’s something I’ve never forgotten. These are the memories we try to create with our own children and grandchildren that seem so basic but are actually ones that can get passed on to future generations if we keep them alive. Besides only requiring a piece of paper, this is a fun family activity that we have spent many an hour doing.
My grandkids love to challenge one another to see whose plane flies the farthest or flies back to them. Ha, I still even enjoy making these smooth-flying gliders! All you need is a sheet of standard paper, 8.5 x 11, to make plain white airplanes or use colored paper. For extra added detail let the kids decorate with markers or pens. These paper airplane gliders are fun to fly, both indoors or outside. It’s a fun spur of the moment activity or one that you can plan as an afternoon “best airplane pilot competition”. Fun for all age groups.
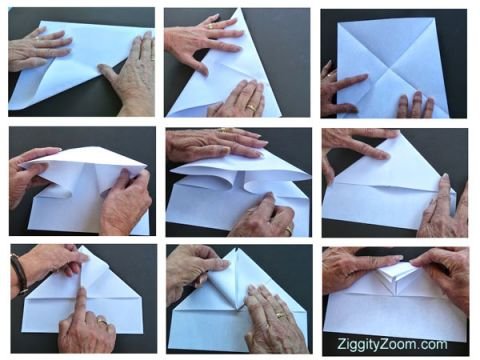
Here is our easy step by step photo tutorial for making the ultimate gliding paper airplane. This plane will loop and glide, taking unexpected turns along the way.
- Fold the short side of the paper over to the right, even with the edge, and make a crease.
- Unfold and repeat folding to the left.
- Fold paper as shown to make a point, crease in place.
- Fold each side tip, upward, to make a point.
- Fold top point down now to meet the fold line. Crease well.
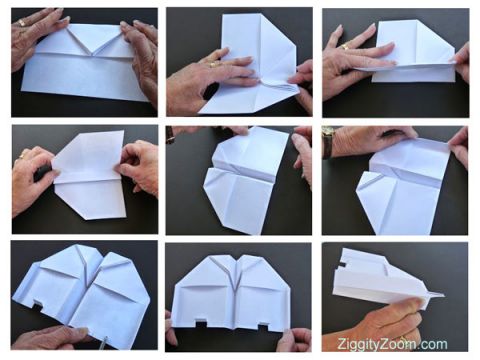
- Fold plane in half and crease. Fold each wing back, leaving 1/2 inch at the bottom and crease.
- Fold both outside edges up about 1/4″ and leave folded edge pointing upwards.
- Make two 1/4″ cuts, about 1/2″ apart, in the tail sections and fold as show in photo.
- Hold the airplane in the very front, as shown, to get a good glide going.
- Happy flying!
Create a little extra Happiness with “Spur of the moment” family fun. Mix in a few hugs & smiles and you will have created a magical memory.[/bpiq]


